
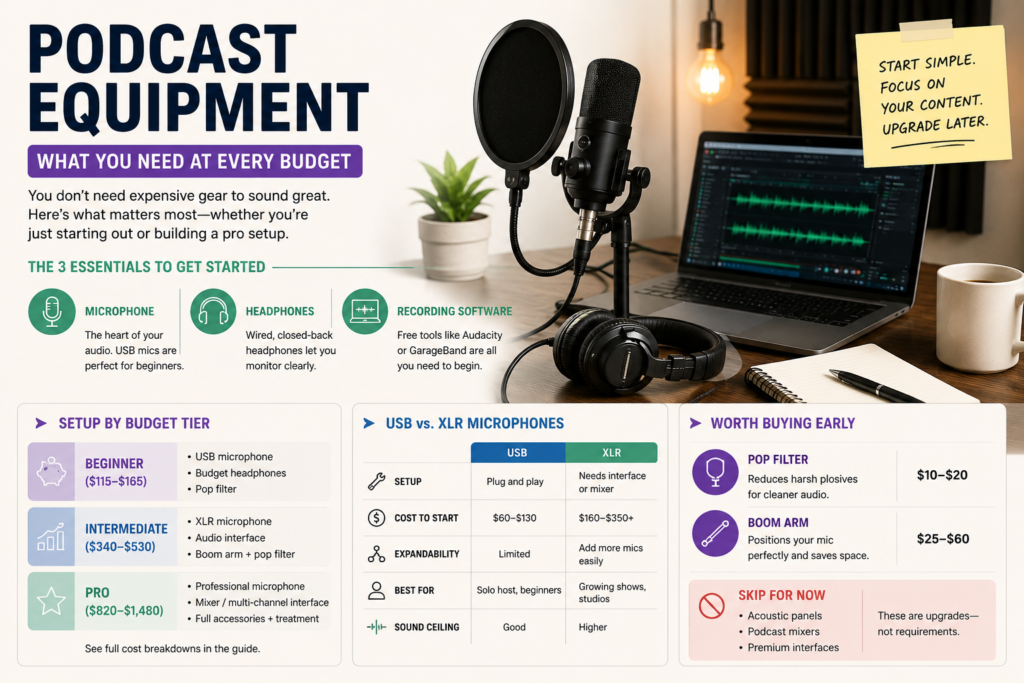
To start a podcast in 2026, you need four things: a USB microphone, wired headphones, free editing software, and a podcast hosting platform. That’s it.
Here’s the bare minimum setup that works right now:
- Mic: Samson Q2U (~$70)
- Headphones: Any wired earphones you already own
- Editing software: Audacity (free)
- Hosting: Spotify for Creators (free) or Buzzsprout
You don’t need a mixer, a soundproofed room, or expensive gear. Most successful podcasts started with a setup under $100. Read on to understand exactly what to buy, why, and what to skip entirely.
When most people think about starting a podcast, they picture Joe Rogan’s studio — massive microphones, foam-covered walls, a mixing board with a hundred knobs. It looks expensive. It looks complicated. And it puts a lot of people off before they ever record a single word.
Here’s the truth: you don’t need any of that. What you need is a simple, reliable setup that gets out of your way and lets you focus on making a great show.
This guide covers exactly that — the right podcast equipment for beginners in 2026, clearly explained, with honest recommendations and nothing you don’t need yet.
Podcast Equipment at a Glance: Budget vs. Intermediate Setup
Before we go into detail, here’s a quick overview of two solid setups — one for getting started, one for when you’re ready to level up.
| Equipment | Budget Setup (~$70–100) | Intermediate Setup (~$250–350) |
| Microphone | Samson Q2U ($70) | Shure MV7 ($249) or Rode PodMic USB ($99) |
| Headphones | Any wired earbuds you own | Sony MDR7506 (~$90) |
| Audio interface | Not needed | Focusrite Scarlett Solo (~$120) — XLR only |
| Pop filter | Not yet | Any nylon mesh pop filter ($10–15) |
| Editing software | Audacity (free) | Audacity or GarageBand (free) |
| Hosting | Spotify for Creators (free) | Buzzsprout ($12/month) |
| Estimated total | ~$70 | ~$280–350 |
Prices are approximate USD as of 2026. Free software options apply to both setups.
The budget setup is genuinely good enough to launch and grow a podcast. Upgrade only when you’ve got a few episodes under your belt and know the show is something you’ll stick with.
1. The Microphone: The One Piece of Gear Worth Getting Right
The microphone is the most important purchase you’ll make. It’s the only piece of hardware that directly affects your audio quality in a way your listeners will actually notice.
But here’s where most beginners overthink it: the difference between a $70 mic and a $300 mic is smaller than the difference between a $70 mic used correctly and one used badly. Good placement beats expensive gear every time.
USB vs XLR — Which Should Beginners Choose?
USB microphones plug straight into your laptop. No extra hardware, no cables to manage, no interface to configure. For beginners, this is almost always the right choice — as reviewed by TechCrunch, USB mics are the go-to plug-and-play solution for the wave of new podcasters entering the space.
XLR microphones need an audio interface between the mic and your computer. They offer more control at the pro level — but they also introduce more things that can go wrong. Start with USB. Switch to XLR later if you outgrow it.
Dynamic vs Condenser Mics — What’s the Difference?
Dynamic microphones pick up sound from directly in front of them and reject background noise. They’re forgiving in untreated rooms — a spare bedroom, a home office, a kitchen table.
Condenser microphones capture more detail, but they also capture more of everything else: air conditioning, fridge hum, traffic outside. They work best in properly treated spaces. For most beginners recording at home, a dynamic mic is the smarter pick.
Best Beginner Mic Picks for 2026
The Samson Q2U (~$70) is the top recommendation. It’s a dynamic USB mic that’s been around since 2007 and has barely changed — because it didn’t need to. Reliable, great-sounding, and it comes with a stand, windscreen, and cables included.
The Audio-Technica ATR2100x (~$79) is a solid alternative with a slightly warmer tone. The Rode PodMic USB (~$99) is a step up if you want broadcast-quality sound from day one.
One tip on placement: sit 4–6 inches from the mic and angle it slightly (10–15 degrees) away from your mouth. Speaking directly into the mic makes plosive sounds — those harsh ‘p’ and ‘b’ bursts — much more pronounced. If you can hear yourself breathing heavily into the recording, you’re too close or too on-axis. Adjust until the voice sounds clear and natural, and do a short test recording before every session.
2. Headphones: Why You Can’t Record Without Them
A lot of beginners skip headphones entirely. That’s a mistake — and it often ruins otherwise good recordings.
When you record without headphones, your microphone picks up the audio coming from your speakers or your guest’s voice playing through your computer. This creates a faint echo on your track that’s painful to edit out and sounds unprofessional.
Why Wired Headphones Are Non-Negotiable
Bluetooth headphones introduce latency — a lag of around 160–260ms between what’s happening and what you hear. That’s long enough to throw off your speaking rhythm and make it hard to catch audio problems as they happen. Wired headphones have a latency of roughly 5ms. You hear things in real time.
Any wired earphones you already own will work fine for recording. The Apple EarPods that came with your iPhone are genuinely a decent starting point.
When you’re ready to upgrade, the Sony MDR7506 (~$90) is the go-to recommendation from audio engineers. Flat response, closed-back design, comfortable for long editing sessions. They’ve been an industry standard for decades for a reason.
3. Recording Software: Free Options That Actually Work
You don’t need to spend anything on editing software to start. The free options are genuinely good.
Audacity is the standard recommendation for beginners. It’s free, runs on Mac and Windows, and has everything you need: multi-track editing, noise reduction, normalization, and fade in/out. Yes, the interface is a bit dated. It still gets the job done, and thousands of professional podcasters use it.
GarageBand is the better option if you’re on a Mac. It’s already installed, the interface is cleaner, and it handles everything a beginner needs without any learning curve.
If you’re recording with a remote guest, Riverside.fm is the best option for audio quality. It records each person locally and syncs the tracks, so a bad internet connection doesn’t ruin the audio. There’s a free tier that gives you two hours of recording to try it out.
A few quick editing tips that make a real difference:
- Apply Normalize to balance your volume levels across the whole episode
- Use Noise Reduction to clean up any background hum before it becomes noticeable
- Cut long silences and awkward pauses — your listeners will thank you
- Add a short fade in at the start and fade out at the end for a polished finish
- Export as MP3 at 128kbps for a file size that uploads quickly without sacrificing quality
4. Podcast Hosting: Where Your Show Actually Lives
Once you’ve recorded and edited your episode, you need somewhere to host it. A podcast host stores your audio files and distributes your show to Spotify, Apple Podcasts, and everywhere else automatically. With data from Statista showing that nearly half of all U.S. adults listened to a podcast in the past month in 2024, getting your show onto every major platform from day one matters more than ever.
This is a step a lot of beginners miss — you can’t just upload an MP3 to Spotify directly. You need a hosting platform that generates an RSS feed, which is how podcast apps find and sync your show.
Spotify for Creators (formerly Anchor) is completely free and the easiest place to start. It’s owned by Spotify, so distribution is seamless. The analytics are basic, but more than enough when you’re starting out.
Buzzsprout is the best option if you want something slightly more polished. The free plan gives you 90 days and up to 2 hours of audio per month. The $12/month plan is plenty for most podcasters releasing episodes every week or two.
5. Nice-to-Have Gear (Buy These Later, Not Now)
These items will improve your setup eventually — just don’t let them stop you from starting.
Pop filter (~$10–15): A thin mesh screen that sits between your mouth and the mic. It reduces plosive sounds significantly and is worth buying once you’re a few episodes in.
Boom arm (~$20–50): Clamps to your desk and holds your mic at the right height without taking up desk space. Also reduces vibrations from typing.
Audio interface (~$120): Only relevant if you move to an XLR microphone. The Focusrite Scarlett Solo is the standard recommendation at this level.
Acoustic treatment: Before buying foam panels, try recording in a closet full of clothes. Soft furnishings absorb sound better than you’d expect. It’s free and often more effective than budget acoustic tiles.
Full Gear Checklist with Prices (2026)
| Item | Recommended Product | Approx. Price | Priority |
| Microphone | Samson Q2U | $70 | Must-have |
| Headphones | Wired earbuds you own | $0 | Must-have |
| Editing software | Audacity | Free | Must-have |
| Podcast hosting | Spotify for Creators | Free | Must-have |
| Pop filter | Any nylon mesh filter | $10–15 | Buy later |
| Boom arm | Rode PSA1 or budget equivalent | $20–100 | Buy later |
| Upgraded headphones | Sony MDR7506 | $90 | Buy later |
| Audio interface | Focusrite Scarlett Solo | $120 | XLR only |
| Upgraded mic | Shure MV7 or Rode PodMic USB | $99–249 | Buy later |
6. Your Recording Space Matters More Than Your Gear
This is the part most gear guides skip — and it’s probably the most useful thing in this article.
A $50 microphone in a quiet, soft-furnished room will sound better than a $300 microphone in a bare, echo-prone space. Room acoustics affect your audio more than almost any hardware upgrade you can make.
The easiest fix? Record in a wardrobe or closet full of clothes. The fabric absorbs sound reflections and cuts down on echo almost instantly. If that’s not practical, hang a thick duvet or blanket behind you while you record.
A few other quick wins that cost nothing: turn off the air conditioning or fan before you hit record, close the windows, and move away from hard surfaces like bare walls and wooden floors. If you have a bookshelf, recording near it helps — books are surprisingly effective at absorbing sound. These small changes can dramatically improve the sound of even the most basic setup.
Conclusion
Starting a podcast doesn’t require a big investment or a complicated setup. A USB mic, a pair of wired headphones, free editing software, and a hosting platform is all you need to publish your first episode today.
The Samson Q2U at $70 is the single best recommendation for most beginners — reliable, great-sounding, and complete out of the box. Pair it with Audacity and Spotify for Creators and you’re ready to go.
Focus on your content first. Upgrade your gear once the show has found its footing and you know it’s something you’ll keep making. A lot of the most loyal podcast audiences out there were built on a $70 mic and a bedroom closet. The gear never made the show — the host did.
FAQs: Podcast Equipment Questions Beginners Actually Ask
Can I start a podcast with just my phone?
Yes. Most modern smartphones record surprisingly good audio. Use your phone’s voice memo app rather than the camera, put it in airplane mode to avoid interruptions, and hold it about six to twelve inches from your mouth. It won’t sound as polished as a dedicated mic, but it’s a perfectly valid way to start and test whether podcasting is right for you.
Do I need a mixer to start a podcast?
No. A USB microphone plugs directly into your computer and records clean audio without any additional hardware. Mixers are useful when you have multiple guests recording in the same room using separate XLR mics — that’s not a beginner scenario. Skip the mixer until you genuinely need it.
Can I use Bluetooth headphones for podcasting?
Not for recording. Bluetooth introduces a latency of 160–260ms, which makes it hard to monitor your voice in real time and catch audio issues as they happen. Use wired headphones while recording. You can use wireless headphones for casual listening back, but not when you’re actually at the mic.
How much does it cost to start a podcast?
As little as $0 if you use your phone and Spotify for Creators. With a proper USB mic setup, expect to spend around $70–100 for everything you need to produce a show that sounds professional. You don’t need to spend more than that to build a real audience.