
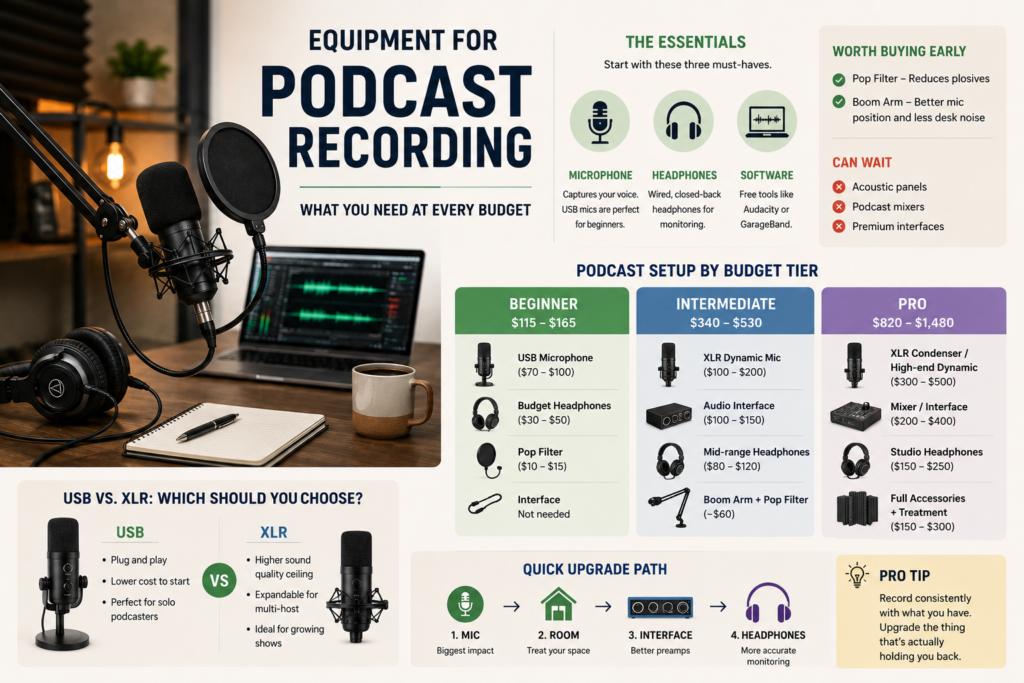
The best podcast equipment for most beginners is a USB dynamic microphone like the Samson Q2U (~$70), a pair of wired headphones, and free recording software like Audacity. That is genuinely all you need to publish your first episode. Everything else is optional — and you can add it later once you know podcasting is for you.
When most people start researching podcast equipment, they end up down a rabbit hole of XLR cables, audio interfaces, and $400 microphones. It feels overwhelming fast.
The truth is, the barrier to starting a podcast has never been lower. The gear has gotten better, cheaper, and simpler. According to data from Statista, the share of Americans consuming podcasts monthly has more than tripled over the past decade — which means there has never been a better time to start your own show.
What matters far more than your equipment is your recording environment — and your content. This guide covers everything from a $70 beginner setup to a solid intermediate rig, with honest recommendations based on what actually works in 2026.
What equipment do you actually need to start a podcast?
There are only three things you genuinely need: a microphone, headphones, and recording software. That is the whole list. Anything beyond that is a quality-of-life upgrade, not a requirement.
Your recording environment matters more than any piece of gear you buy. A basic setup recorded in a small, carpeted room will consistently beat expensive equipment used in an echo-heavy space. If you can record in a room with soft furnishings — rugs, sofas, bookshelves — you are already ahead of most beginners.
| Equipment | Do you need it? | Notes |
| Microphone | Essential | USB mic for beginners — no extra gear needed |
| Wired headphones | Essential | Prevents mic bleed and latency issues |
| Recording software | Essential | Audacity is free and more than capable |
| Pop filter / windscreen | Recommended | Reduces harsh “p” and “b” sounds |
| Boom arm | Optional | Keeps desk clear, helps mic placement |
| Audio interface | Optional | Only needed if you move to an XLR microphone |
| Acoustic treatment | Optional | A carpeted room works just as well to start |
Podcast equipment by budget: quick comparison
Not everyone is starting from the same place. Some people want the cheapest possible setup that still sounds good. Others are ready to invest a little more from day one.
Here is a breakdown of the three main tiers, so you can see exactly where your money goes as you spend more.
| Budget tier | Microphone | Headphones | Interface / Mixer | Approx. total |
| Starter (~$70–100) | Samson Q2U (USB) | Apple EarPods or any wired pair | Not needed | ~$70–100 |
| Intermediate (~$200–350) | Rode PodMic (XLR) | Audio-Technica ATH-M20x | Focusrite Scarlett Solo | ~$280–350 |
| Pro (~$500+) | Earthworks ETHOS | Sony MDR-7506 | RODECaster Duo | ~$700–900 |
Gear complexity vs. audio quality gain
The chart below shows the relationship between how complex your setup gets and how much audio quality you actually gain. The biggest jump happens between nothing and a basic USB mic. After that, returns diminish quickly.
Audio quality gain vs. setup complexity
High | *
| *
| *
| *
Low |___________________________
No mic Starter Mid Pro
The lesson here: start simple. The jump from no mic to a $70 USB mic is the single biggest improvement you can make. Going from a $70 mic to a $300 mic? Much smaller difference to the average listener’s ear.
The best podcast setup for beginners (under $100)
You do not need to spend more than $100 to sound good. Here is the exact setup that works — and that experienced podcasters still reach for when they travel.
1. Microphone — Samson Q2U (~$70)
The Samson Q2U has been around since 2007 and has barely changed, because it got it right the first time. It is a dynamic microphone, which means it naturally rejects background noise — traffic, air conditioning, keyboard clicks.
It comes with both USB and XLR outputs, so it works directly with your laptop and also gives you room to grow. It includes a mic stand, windscreen, and all the cables you need right in the box.
Other solid beginner options include the Audio-Technica ATR2100x ($79) and the RØDE NT-USB Mini ($99). But the Q2U is the one most professionals still recommend to friends and family.
2. Headphones — any wired pair you already own
Wired headphones are non-negotiable when recording. There are three reasons for this.
First, they let you monitor your own voice in real time so you catch audio issues before they ruin a recording. Second, they prevent mic bleed — where your guest’s audio leaks into your microphone track. Third, wired headphones have almost zero latency, while Bluetooth headphones can introduce significant audio delay, as documented in research from Wikipedia on Bluetooth audio codecs, which makes it hard to speak naturally during recording.
Apple EarPods work perfectly. So do any cheap wired earbuds you have lying around. The brand does not matter — just make sure they are wired and plug into your mic’s headphone jack.
3. Recording software — Audacity (free)
Audacity is free, available on Mac and Windows, and has been the go-to for beginner podcasters for years. It handles recording, basic editing, and audio effects like equalization and compression.
For remote recordings — interviewing guests over the internet — Riverside.fm is the best option in 2026. It records each person’s audio locally, which means your guest’s bad Wi-Fi does not ruin your recording. There is a free tier to start.
Ready to upgrade? The intermediate podcast setup ($200–$350)
Once your podcast has some momentum and you want noticeably better audio quality, this is where to invest. The jump from USB to XLR is where most podcasters move when they are serious about the long term.
1. Microphone — Rode PodMic (~$100)
The Rode PodMic is a broadcast-grade dynamic XLR microphone built specifically for podcasting. It has a tight cardioid pickup pattern that rejects room noise well, and it sounds noticeably fuller and richer than most USB microphones at the same price.
2. Audio interface — Focusrite Scarlett Solo (~$120)
An audio interface is the box that sits between your XLR microphone and your computer. It converts the analog signal from your mic into a digital signal your computer can record. The Scarlett Solo is the most recommended beginner interface for good reason — it is reliable, simple to use, and sounds clean.
3. Boom arm — RØDE PSA1+ (~$100) or budget alternative (~$25)
A boom arm clips to your desk and lets you position your microphone exactly where you need it without it sitting in your way. It also reduces desk vibration getting into your recordings. The RØDE PSA1+ is the premium pick. If you want to start cheap, a $25 arm from Amazon works fine while you test whether you need it.
Podcasting on the go: wireless and mobile equipment
Not every podcast is recorded at a desk. Interview shows, travel content, and street recordings need a different approach.
The RØDE Wireless GO II is the standout option for wireless recording in 2026. It clips onto your guest’s collar, transmits audio wirelessly to a receiver on your camera or recorder, and records a backup copy internally. The audio quality is genuinely broadcast-grade.
For smartphone recording, pair a lavalier microphone with a recording app like Voice Memos (iOS) or Hi-Q MP3 Recorder (Android). You can produce clean, publishable audio from a phone — the key is getting the mic close to the speaker’s mouth and recording somewhere quiet.
Tips that matter more than the gear you buy
Good habits will do more for your audio quality than any equipment upgrade. These are the four things worth getting right from day one.
Keep your microphone 4 to 6 inches from your mouth, angled slightly rather than pointed straight at your lips. This alone eliminates most plosive sounds — the harsh pop on “p” and “b” words.
Record in the smallest, softest room available. Closets are genuinely excellent recording spaces. The clothes absorb reflections and the tight space kills echo.
Start with one mic and one pair of headphones. Every extra cable or piece of gear introduces another point of failure. Simple setups are more reliable.
Focus on your content first. Listeners forgive average audio if the conversation is interesting. They do not forgive boring content recorded on expensive gear.
Final thoughts
The best podcast equipment is the equipment you actually start with. A $70 microphone and free software have launched thousands of successful shows. Gear does not make a podcast — consistency and content do.
Start with the beginner setup. Record ten episodes. Then, if audio quality is genuinely holding you back, invest in the intermediate tier. Chances are, by then you will know exactly what you need — and why.
Frequently asked questions
What is the best microphone for a beginner podcast?
The Samson Q2U is the best beginner microphone for most people. It costs around $70, sounds excellent, comes with everything you need in the box, and works directly with your laptop via USB. It is also durable enough to travel with.
Do I need an audio interface to start a podcast?
No. If you use a USB microphone like the Samson Q2U or the Blue Yeti Nano, you plug it directly into your computer — no interface needed. An audio interface only becomes necessary when you move to an XLR microphone.
Should I use a condenser or dynamic microphone for podcasting?
For most home setups, a dynamic microphone is the better choice. Dynamic mics reject background noise naturally, which means they sound clean even in untreated rooms. Condenser mics capture more detail, but they also pick up every sound in the room — including air conditioning, traffic, and keyboard noise.
Can I record a podcast on my phone?
Yes, and it works better than most people expect. Use a lavalier microphone plugged into your phone’s headphone jack, record in a quiet room, and use a free app like GarageBand (iOS) or Audacity (via a laptop connected to the phone’s recording). The result will not match a studio setup, but it is more than good enough to publish.