
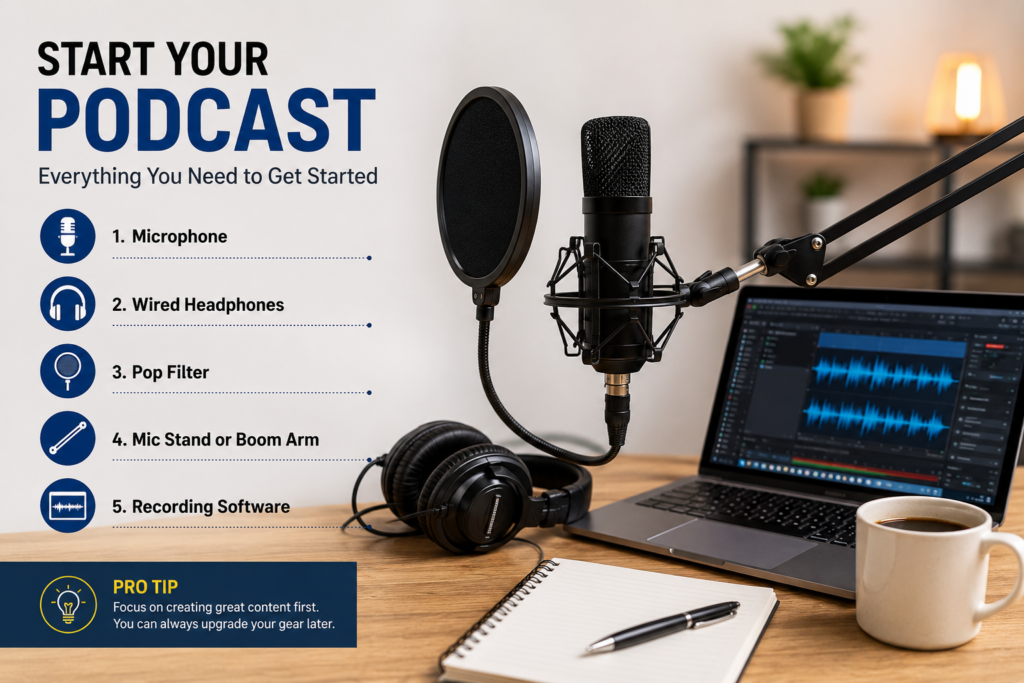
What equipment is needed to start a podcast comes down to five core items: a microphone, wired headphones, recording software, a pop filter, and a quiet space. You can launch for under $100. Every other piece of gear is optional until you decide the show is permanent.
The Minimum Viable Podcast Setup — What You Actually Need for Episode 1
Most working podcasters launched on a setup that cost less than a dinner out. The idea that you need a treated studio and a rack of gear before recording episode one is the single biggest reason people never start.
The 3-Item Bare Minimum (Mic, Headphones, Free Software)
Strip it down to three things: a microphone, a pair of wired headphones, and free recording software. A USB dynamic mic in the $50–$80 range, a pair of wired earbuds or basic closed-back headphones, and Audacity (free, cross-platform) will produce audio that is entirely listenable. That is the complete technical requirement for a first episode.
Nothing else is mandatory on day one.
Why Your Room Matters More Than Your Gear in 2026
This is the part most gear guides skip. A $400 condenser mic in a bare, echo-heavy room sounds worse than a $70 dynamic mic in a carpeted bedroom. Room treatment is not an optional luxury — it is the foundation everything else sits on.
Quick Room Audit Checklist
Before spending money on gear, spend five minutes on your room:
- Rugs and carpet — Hard floors create flutter echo. A rug under your desk helps immediately.
- Curtains or heavy drapes — Bare windows reflect sound. Closed curtains absorb it.
- Closet option — Recording surrounded by hanging clothes is legitimately effective acoustic treatment.
- HVAC off — Air conditioning and heating systems are the most common source of low-frequency hum in podcast audio. Turn them off before recording.
- Door closed, phone silenced — Obvious, but commonly skipped.
Fix the room first. Then assess whether you actually need a mic upgrade.
When a Smartphone Is an Acceptable Starting Mic
A current smartphone, held 6–8 inches from your mouth at a slight angle, records surprisingly usable audio when the room is quiet and treated. It is not optimal. But it removes the cost barrier entirely and lets you test whether you enjoy making the show before spending anything. If you record five episodes and still want to continue, then buy a dedicated microphone.
Podcast Equipment Budget Tiers — What You’ll Spend at Each Level
The honest answer on cost: you can start for under $100, build a genuinely solid setup for around $250, and reach professional-adjacent quality for $500–$700. Most podcasters who stick with it land somewhere in Tier 2 by the end of their first year.
Retailer marketing tends to push people toward Tier 3 on day one. In practice, most people who start at Tier 3 without prior audio experience spend money solving problems they do not yet have.
How to Read the Budget Breakdown Below
Prices reflect current street prices across major online retailers. Ranges reflect the realistic spread between entry-level and mid-range options within each tier. “Tier Total” assumes one purchase per category.
| Tier | Key Items | Estimated Cost Per Item | Tier Total |
| Tier 1: Bare Minimum | USB dynamic mic, wired headphones, free DAW (Audacity), pop filter | Mic $50–80, Headphones $20–40, Pop filter $10–15, DAW free | ~$80–135 |
| Tier 2: Solid Starter | Mid-range USB condenser or dynamic mic, closed-back headphones, boom arm, pop filter, free or entry DAW | Mic $100–130, Headphones $50–70, Boom arm $25–40, Pop filter $15, DAW free–$30 | ~$200–285 |
| Tier 3: Serious Upgrade | XLR dynamic mic, audio interface, professional closed-back headphones, boom arm, shock mount, pop filter, paid DAW | Mic $100–150, Interface $100–160, Headphones $80–100, Boom arm $40–60, Shock mount $20–35, Pop filter $15, DAW $60–120/yr | ~$450–640 |
What Each Tier Gets You in Practice
Tier 1 gets you on the air. Audio quality is noticeably limited but perfectly acceptable for a show finding its footing. No editing complexity, no hardware dependencies.
Tier 2 is where most listeners stop noticing gear quality as a problem. A mid-range USB mic with a boom arm and proper room treatment sounds professional to the majority of audiences.
Tier 3 is where diminishing returns start. The jump from Tier 1 to Tier 2 is audible to any listener. The jump from Tier 2 to Tier 3 is mainly audible to other audio engineers.
The One Upgrade With the Highest ROI After Your First 10 Episodes
A boom arm. Not a better mic. A boom arm positions the microphone consistently at the right distance and angle, removes handling noise, and frees up desk space. It costs $25–40. The improvement in consistency — which directly affects perceived audio quality — outperforms mic upgrades at a fraction of the price.
Microphones — The Most Important Purchase Decision
The microphone is the single piece of gear that most directly affects your sound, and the USB-versus-XLR decision is the fork that determines everything downstream.
USB vs. XLR Microphones — Which Type Do You Need Right Now?
| Feature | USB Mic | XLR Mic |
| Connection | Direct to computer via USB | Requires audio interface or mixer |
| Cost Range | $50–$200 | $80–$400+ |
| Requires Audio Interface? | No | Yes |
| Best For | Solo podcasters, beginners, remote setups | Multi-host setups, studio environments, future-proofing |
| Setup Complexity | Plug and play | Moderate — requires gain staging, phantom power if condenser |
| Sound Quality Ceiling | Good to very good | Excellent — limited mainly by the interface quality |
For a solo podcaster starting out: USB is the correct choice. Simpler, cheaper, no additional hardware. The quality ceiling on modern USB mics is higher than it was even a few years ago. XLR becomes relevant when you add co-hosts recording in the same room, or when you decide audio quality is a core differentiator for your show.
Dynamic vs. Condenser — The Distinction That Matters in Untreated Rooms
Why Dynamic Mics Win in Untreated Home Spaces
Dynamic microphones have a tighter pickup pattern and reject more ambient sound. They are less sensitive to room reflections, background noise, and the kind of acoustic imperfection that characterises most home recording spaces. For anyone recording without professional acoustic treatment, a dynamic mic is the forgiving, practical choice.
When a Condenser Mic Is Worth the Risk
Condenser microphones are more sensitive — which means they capture more detail, but also more of everything else in the room. They reward proper acoustic treatment. If your recording space is carpeted, furnished, and quiet, a condenser will deliver noticeably richer audio. If it is not, a condenser will punish you with every refrigerator hum and street noise.
Cardioid Pickup Pattern — Why It Is the Default Choice for Podcasters
Cardioid microphones capture sound primarily from the front and reject sound from the sides and rear. This is the pattern you want for solo and multi-host podcast recording. Omnidirectional patterns pick up the room. Bidirectional patterns pick up the room from two sides. Cardioid keeps the focus on the host’s voice.
USB-C Compatibility Warning — A Current Purchase Gotcha
Many well-regarded USB microphones still ship with USB-A cables. Current MacBooks have no USB-A ports. Several recent Windows laptops are USB-C only or have a single USB-A port shared with other peripherals. Before purchasing, check whether the mic ships with a USB-C cable or includes an adapter. If it does not, factor in an additional $10–15 for a USB-A to USB-C adapter. This is a small but genuinely frustrating surprise on recording day one.
Microphone Recommendations by Tier
Tier 1 (~$50–80): The Audio-Technica ATR2100x-USB is a USB/XLR hybrid dynamic mic that remains one of the best value starting points available at around $70–80.
Tier 2 (~$100–130): The Samson Q2U offers similar USB/XLR flexibility with solid build quality. The Rode PodMic USB (USB-C native) addresses the adapter problem entirely and sits at the lower end of this tier.
Tier 3 (~$100–150 XLR): The Shure SM7dB is an active dynamic mic with a built-in preamp that reduces interface gain requirements — a genuine quality-of-life improvement for XLR setups.
Headphones — Why Wired Is Non-Negotiable
Wired headphones are required for podcast recording monitoring. This is not a preference. It is a technical constraint.
The Bluetooth Latency Problem
Wired headphone latency is typically imperceptible. Bluetooth headphone latency can be high enough that you hear your own voice played back with a noticeable delay. The human auditory system begins perceiving echo and disorientation at relatively low delay thresholds — and common Bluetooth codecs exceed those thresholds comfortably, according to Wikipedia. Recording your voice while hearing it played back with that delay is disorienting to the point of disrupting natural speech rhythm. It also makes it nearly impossible to catch problems — mouth noise, plosives, background intrusions — in real time.
Use wired headphones. Keep the Bluetooth headphones for listening to the finished episode.
Open-Back vs. Closed-Back Headphones for Podcast Recording
Closed-back headphones are the correct choice for recording. They isolate your ears from ambient sound and, critically, prevent headphone audio from leaking into the microphone signal. Open-back headphones provide a more natural soundstage but bleed sound — a genuine problem if you are monitoring while recording.
In-Ear Monitors as a Budget Alternative
Standard wired earbuds — including the ones that came with a smartphone — work functionally well as recording monitors. They are closed-back by nature, latency is negligible, and cost is zero if you already own them. Sound quality for monitoring is more than adequate at this price point.
Headphone Recommendations by Price Point
Budget (~$20–40): Sony MDR-ZX310 or Audio-Technica ATH-M20x. Both closed-back, both wired, both durable.
Mid-range (~$60–80): Audio-Technica ATH-M40x. Flat frequency response makes it genuinely useful for editing as well as monitoring.
Upgrade (~$100+): Audio-Technica ATH-M50x. A widely used reference choice for podcast and home studio monitoring. Not necessary at the start — but a purchase you will not repeat.
Audio Interface vs. Mixer — What Each Does and When You Need One
Neither an audio interface nor a mixer is required for a USB microphone setup. This entire section only applies when you move to XLR microphones.
What an Audio Interface Does (and the Earliest Point You Need One)
An audio interface converts an XLR analog signal to digital audio your computer can record. It provides phantom power (required for condenser mics), gain control, and typically a headphone monitoring output with zero-latency direct monitoring.
You need one the moment you buy an XLR microphone. Not before. The most practical entry-level option is a single-channel interface in the $100–$160 range.
What a Podcast Mixer Does and When It Is Worth the Extra Cost
A podcast mixer handles multiple XLR inputs simultaneously, adds onboard processing (compression, EQ, sound pads), and is designed specifically for broadcast workflows. It costs more than a basic interface and adds complexity that is genuinely useful — but only for shows with multiple in-room hosts or live streaming components.
For a solo podcaster or a two-host show recording separately and combining in post-production, a mixer is not necessary.
Can You Skip Both? (The USB Mic Path Revisited)
Yes. A USB microphone bypasses the interface entirely. The audio is converted inside the mic and sent directly to your computer. This is why USB mics remain the default recommendation for anyone starting out — fewer components, fewer potential failure points, lower cost.
Interface and Mixer Recommendations by Tier
Interface, entry (~$100–160): The Focusrite Scarlett Solo is the default recommendation across the industry for good reason — clean preamps, solid build, and reliable drivers. Confirm you are purchasing a current-generation model with USB-C connectivity.
Mixer, entry (~$200–300): The Rodecaster Pro II and Zoom PodTrak P4 are both designed specifically for podcasting rather than repurposed from music production workflows.
Microphone Accessories — Pop Filter, Shock Mount, and Boom Arm
Three accessories come up in every podcast equipment list. Two of them are genuinely useful from the start. One depends entirely on your recording situation.
Pop Filter vs. Windscreen — Which One to Buy
A pop filter is a fabric or metal mesh screen mounted between your mouth and the microphone. It diffuses the burst of air from plosive consonants (P, B, T sounds) that would otherwise produce a low-frequency thud in the recording.
A windscreen is a foam cover that slides over the mic capsule. It is designed for outdoor use — wind noise reduction — and is less effective than a pop filter at controlling indoor plosives.
Buy a pop filter for studio recording. It costs $10–15 and solves a problem that is tedious to fix in editing.
Shock Mount — When It Is Necessary vs. When It Is Wasted Money
A shock mount suspends the microphone in a cradle of elastic bands or rubber, isolating it from vibration transmitted through the desk or stand.
You need one if: your desk vibrates when you type, if you have a loud mechanical keyboard you use during recording, or if you notice a low rumble in your audio that does not come from outside noise.
You do not need one if: your recording space is quiet and you do not touch the desk during recording. In that scenario, a shock mount is $20–35 spent on a problem you do not have.
Boom Arm vs. Desk Stand — Practicality by Recording Style
A desk stand holds the mic on the desk surface, roughly 12–18 inches from your face unless you lean in. Positional consistency depends entirely on remembering to lean in.
A boom arm clamps to the desk edge and lets you position the mic precisely, at mouth level, at a consistent distance. Recording discipline improves automatically because the mic is always in the right place.
For anyone recording regularly, a boom arm at $25–40 is the upgrade with the clearest practical payoff.
Recording and Editing Software — Free vs. Paid Options Compared
Software is the one category where the free options are genuinely excellent. This is not a budget compromise — for most podcasters, free tools handle everything the show requires.
What Software Does a Podcaster Actually Need?
At minimum: something that records audio to your computer and lets you cut it. That is the entire functional requirement for episodes one through fifty of most shows. Advanced features — multitrack editing, noise reduction, remote recording — become relevant as the show grows.
Free Options That Are Genuinely Good Enough (Audacity and GarageBand)
Audacity handles the full production workflow for a solo podcast: recording, noise reduction, level adjustment, cutting, and export to MP3. It is free, open-source, and runs on Windows, macOS, and Linux. The interface is not beautiful. It does not need to be.
GarageBand (macOS and iOS only) is more intuitive and includes better built-in processing. For Mac users, it is the default recommendation over Audacity on user experience grounds alone.
| Software | Price | Platform | Best For | Learning Curve |
| Audacity | Free | Windows, macOS, Linux | Solo recording, basic editing | Low–Medium |
| GarageBand | Free | macOS, iOS | Beginners on Mac, multi-track | Low |
| Descript | Paid (subscription) | Windows, macOS | Text-based editing, transcript workflow | Low |
| Hindenburg Journalist | Paid (annual) | Windows, macOS | Spoken-word audio, broadcast workflow | Medium |
| Adobe Audition | Via Creative Cloud subscription | Windows, macOS | Advanced production, existing Adobe users | High |
When to Upgrade to Paid Software
Upgrade when one of three things happens: you start editing transcripts and want text-based editing (Descript); you publish multiple episodes per week and need speed (Hindenburg); or you are already in the Adobe ecosystem and integration matters more than cost (Audition). None of these scenarios apply to a show in its first ten episodes.
Solo, Co-Host, and Remote Guest Setups — The Decision Framework
The gear list changes meaningfully depending on how many people are in the show and where they are recording.
Recording Solo — Simplified Setup Path
One host. One USB microphone. One pair of wired headphones. Free DAW. This is the simplest version of the setup and the most common starting point. No routing complexity, no interface required, no multi-track management.
Recording Two or More People In the Same Room — What Changes
Two hosts in the same room requires two microphones. A single microphone placed between two people picks up both — with worse quality for both. Each host needs their own mic, their own headphone feed, and a way to combine both signals. This typically means an audio interface with two XLR inputs or a podcast mixer. Gear cost roughly doubles.
Recording Remote Guests — What Each Host Needs Separately
Remote recording means each participant records their own audio locally on their own setup, then the files are combined in editing. Riverside and Zencastr are widely used tools for this workflow — both record high-quality local audio from each participant and upload automatically, as reported by TechCrunch. Each participant still needs their own microphone and headphones. The recording platform handles the rest.
Do not rely on a video call recording as your final audio. The compressed audio quality is audible and difficult to fix in post.
Quick Decision Matrix
| Setup Type | Minimum Gear Required |
| Solo | USB mic + wired headphones + free DAW |
| 2+ hosts, same room | XLR mics per host + interface or mixer + headphones |
| Remote guests | Own setup per host + Riverside or Zencastr |
The Phased Acquisition Roadmap — What to Buy Now, Later, and Maybe Never
Sequencing your purchases matters as much as the purchases themselves. Buying Tier 3 gear before you know the show is permanent is the most common expensive mistake in podcasting.
Buy Now (Episode 1 Essentials)
- USB dynamic microphone ($50–80)
- Wired headphones or earbuds ($0–40)
- Pop filter ($10–15)
- Audacity or GarageBand (free)
- Treat your room (free)
Total: $60–135. Record your first episode. Publish it. Decide if you want to continue.
Buy Later (Episodes 2–10 — When You Know You Are Committed)
- Boom arm ($25–40) — the highest-ROI single upgrade
- Better closed-back headphones if your current ones bleed sound ($50–70)
- Mid-range USB or XLR microphone if you have outgrown your starter mic ($100–130)
- Audio interface if you have moved to XLR ($100–160)
Optional Forever (Gear That Sounds Important but Usually Is Not)
- Acoustic foam panels — effective only when installed comprehensively on all reflective surfaces. A few panels on one wall do almost nothing. Rugs, curtains, and soft furnishings outperform spot-treatment foam for most home setups.
- Headphone amplifier — relevant for audiophile headphones with high impedance. Not relevant for any headphone in the podcast monitoring price range.
- Portable digital recorder — useful for field recording, interviews in remote locations, or travel episodes. Unnecessary for a studio-only show. Consider only if your format genuinely requires it.
Conclusion
Five items — a USB dynamic mic, wired headphones, a pop filter, free recording software, and a quiet room — is the complete starting kit for a podcast. Under $100. The upgrade path exists, but nothing on it is required before episode one. Start with what you have. Upgrade when you know the show is staying.
Frequently Asked Questions About Podcast Equipment
Can I start a podcast with just my phone?
Yes. A current smartphone held at the right distance in a quiet, treated room records usable audio. It is not optimal, but it removes every cost barrier. Record a test episode, decide if you enjoy the format, then invest in a dedicated microphone.
Do I need a mixer to start a podcast?
No. A USB microphone bypasses the need for a mixer entirely. A mixer becomes relevant only for multi-host setups recording in the same room, or for shows with live streaming components. Solo podcasters and remote-format shows do not need one.
What is the difference between a USB and XLR microphone for podcasting?
A USB mic connects directly to your computer — no extra hardware required. An XLR mic requires an audio interface to connect. USB is simpler and cheaper to start. XLR offers a higher quality ceiling and better multi-host flexibility but adds cost and setup complexity.
How much does it cost to start a podcast from scratch?
The realistic minimum is $60–135 for a USB dynamic mic, wired headphones, and a pop filter, with free software. A solid mid-tier setup runs $200–285. Professional-adjacent quality costs $450–640. Most podcasters who stick with it land in the $200–300 range by the end of their first year.
Do I need acoustic foam to record a good podcast?
Not specifically. Acoustic foam works only when installed comprehensively. For most home setups, rugs, curtains, soft furniture, and a closet recording option deliver better acoustic improvement at zero cost. Spot-treating one wall with foam panels has minimal measurable effect.